All-In-One video library & player for iOS/macOS/tvOS
...
Best local and net disk movie/tv player on Mac, creating a local personal media library.
Price reduced to Free Trial!
  • $29.99
  • 0
How to fix damaged app message on macOS
  • Oka Assist
  • 2026-02-08 10:32:56


How to fix damaged app messages on macOS

As a Mac App Developer, I wish everybody could install the app from the Mac App Store or the installation package from the developer's website because it will never have this kind of error message if you get the installation package from the developer.

You only see this message because the installation package is cracked. Maybe it is free to install, but it will bring risks to your whole Mac and your data.

If you see below warning message and can not install or open an app, you can find the solution in this article:

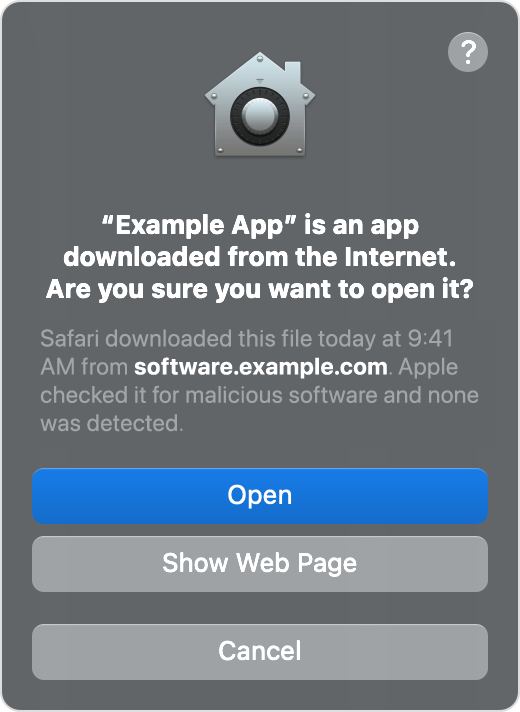
xxx.app can not be opened because it was not downloaded from the App Store.

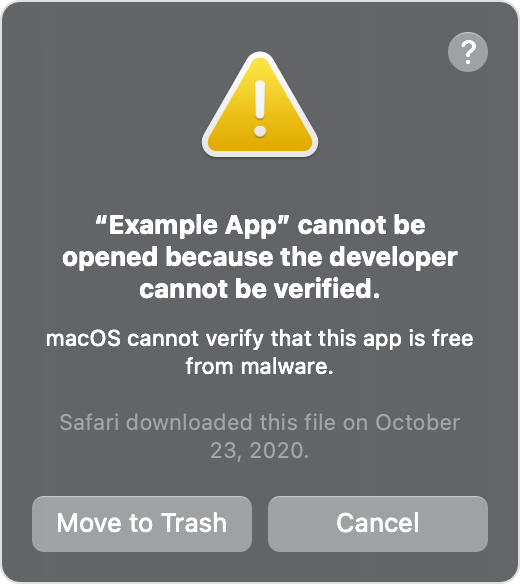
xxx.app can not be opened because the developer can not be verified.

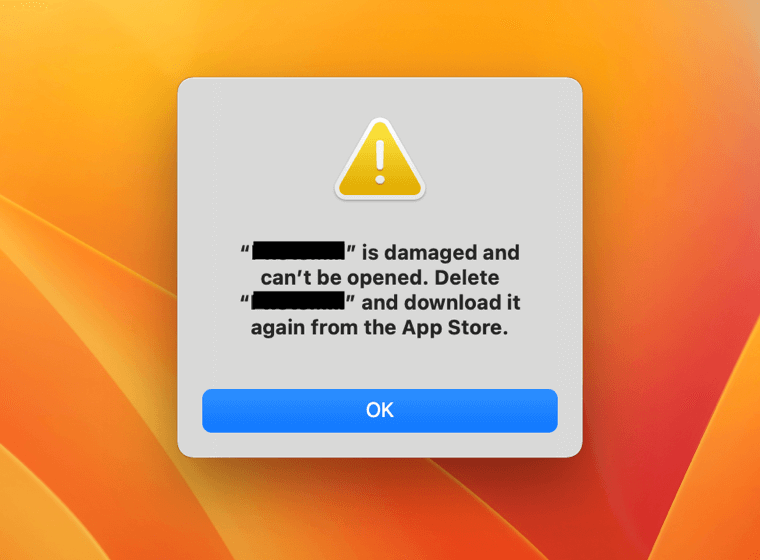
xxx.app will damage your computer. You should move it to the Trash.

The security system on macOS

Before we fix these error messages, we need to know why we have these kinds of error messages. For the security of macOS, there are three levels for the apps you install from 3rd party:

First, the most secure app installation channel is Mac App Store. This is a very secure channel for the user to install the apps. All the apps on App Store need to run in the sandbox, if you know what sandbox is, you will understand App permission is highly controlled on this sandbox, and Apple will review all the apps before they are published to users. You can read all the user comments on the App Store, so you can know if this is a good app or not.

Security preferences window with Allow apps downloaded from: App Store selected

Second, because of the limitations of the sandbox, there are some features you can not develop on the Mac App Store. The developer needs to publish the app out of the Mac App Store. Apple approves this kind of app distribution, but you need to sign and notarize the app by Apple. Apple will check the malware when the developer submits the app to notarize.

Notarized app alert

Third, at most risk levels, the app is not from Apple Store nor notarized by Apple. The primary reason you see the error message while opening the app should cause it. People want to install the free but cracked app, but using these packages is highly dangerous. Find the installation package from App Store or the Developer's website.

macOS alert window: App cannot be opened because the developer cannot be verified.

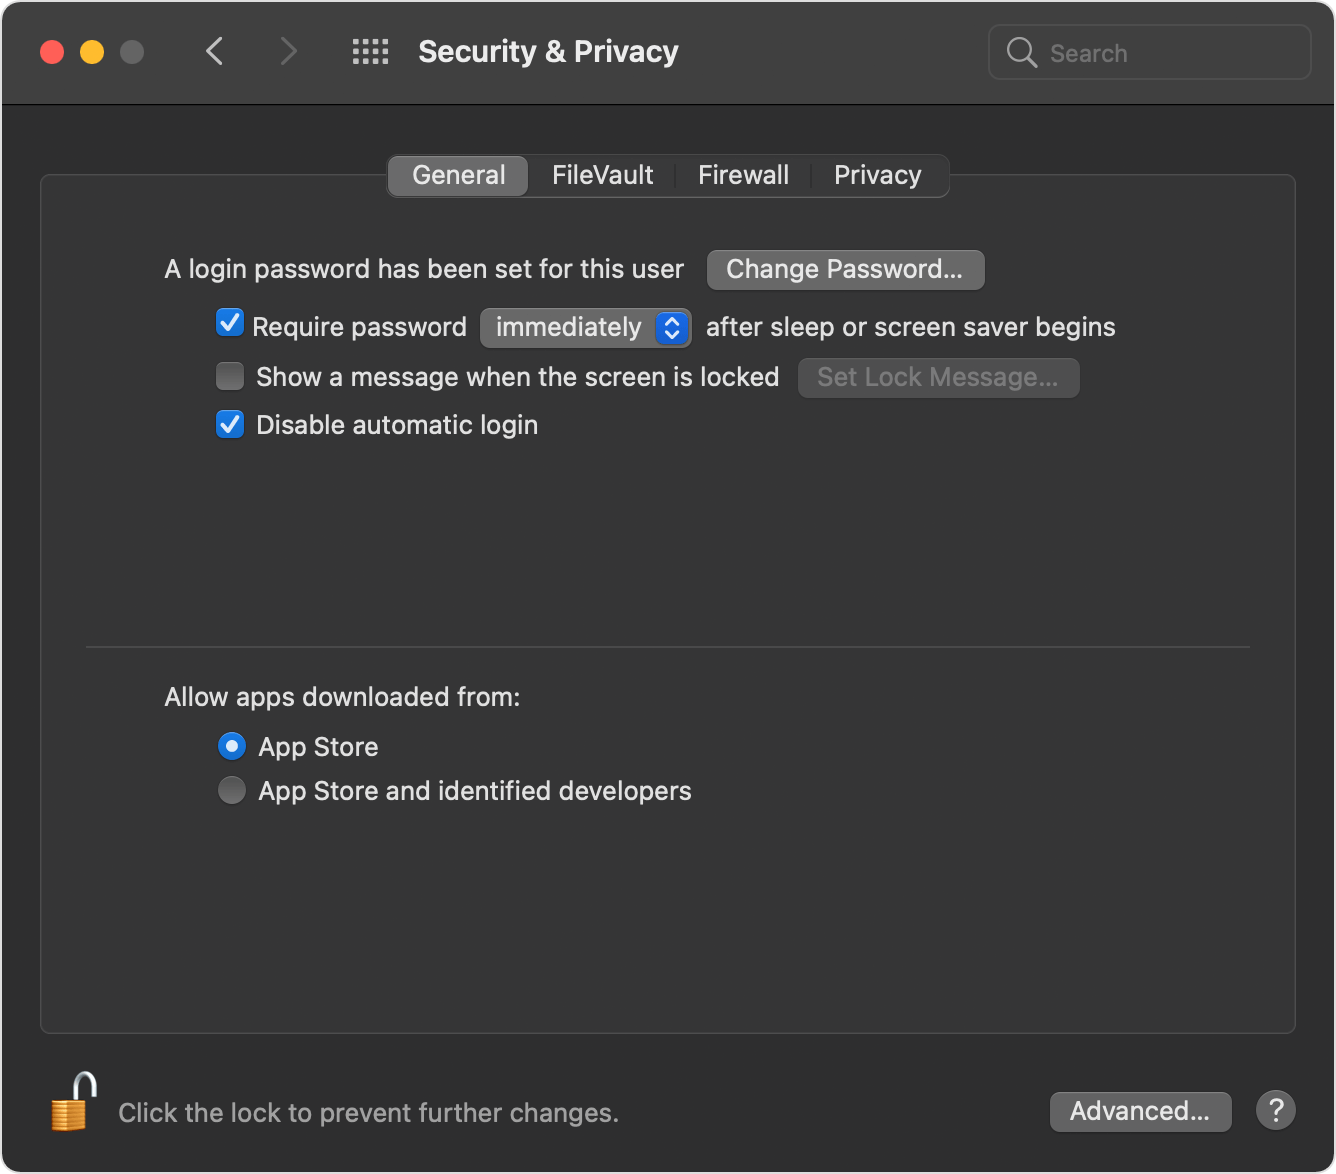
Solution 1:Disalbe the GateKeeper.

It would help if you allowed the "apps downloads from anywhere" so go to System Preference -> Security & Privacy -> General. You will find this option if your macOS is lower than Sierra. If you can not find this option "Anywhere," you need to run some command in the Terminal App ( You can search Terminal app in spotlight 🔍 ), copy the below command into Terminal and press the "Enter" key, and input your mac password.

sudo spctl --master-disable

After you input this command, you can go to the System Preference -> Security & Privacy -> General again; you will find the " Anywhere " option for the app installation channel.

This solution will fix most error messages, but if it does not work, you can try solution 2

Solution 2:Pass through the Notarization Check

You still need the Terminal App; run the below command in the Terminal. Just replace the xxxxxx.app with the application you want to open, like the uPaste.app or any app you want to open.

sudo xattr -rd com.apple.quarantine /Applications/xxxxxx.app

After this command, open the app; it should work. If it still can not be opened, go-to solution 3. Although I strongly recommend you stop here and find the app installation package on Mac App Store or the developer's website. Solution 3 is a hazardous solution for users to try. Please understand the risk by yourself.

Solution 3:Sign the application by yourself.

  1. To sign the application by yourself, you need to install a developer tool and run the below command in Terminal:
xcode-select --install
  1. It will show an installation dialog. Click the continue to finish the installation if the installation is failed due to some network connection. You also can install Xcode through Mac App Store.
  2. Once the xcode tool is installed, run the below command in the Terminal, and replace the xxxxxx.app with the application you want to open, like the uPaste.app or any app you want to open.
sudo codesign --force --deep --sign - /Applications/xxxxxx.app

Congratulations, you can open the app now if you see the result below.

/Applications/xxxxxx.app : replacing existing signature

If you see the result below, you need another command before this codesign command.

/Applications/xxxxxx.app : replacing existing signature
/Applications/xxxxxx.app : resource fork,Finder information,or similar detritus not allowed

Run this command before the codesign command. It will work.

xattr -cr /Applications/xxxxxx.ap

Ok, if you follow the steps and try all these three solutions, the issue should be fixed now. But if not, here is one final answer to disable the security system on macOS. You can read this How to disable System Integrity Protection in macOS?

Again, Running software that hasn’t been signed and notarized may expose your computer and personal information to malware that can harm your Mac or compromise your privacy.

If you still have questions about this, feel free to contact support@7littlemen.com.


Hottest Articles

Latest Articles

Mac System Data Exceeding 200GB? Here’s How to Actually Clear It — A Deep Dive with Heavy Keynote Usage and Time Machine as Examples I. Problem Overview After long-term use, some macOS users discover that “System Data” in Storage Settings grows abnormally large. Common symptoms include: System Data occupying 200GB or more https://cdn.okaapps.com/resource/图2.webp No corresponding files can be located in Finder Deleting caches or log files has little effect Third-party cleaning tools are ineffective Uninstalling and reinstalling apps (such as Keynote) does not help Even after reinstalling macOS, the issue reappears after some time This problem is especially common among heavy productivity users, such as those working extensively with Keynote, Final Cut Pro, or design tools. II. Commonly Tried but Ineffective Solutions Users typically attempt the following methods, most of which fail to solve the problem at its root: Manually deleting directories such as ~/Library/Caches and ~/Library/Logs Using third-party cleaning tools like CleanMyMac or similar utilities Uninstalling and reinstalling Keynote Reinstalling macOS via “Reinstall macOS” These approaches are limited because they do not address the real sources behind System Data inflation. III. What Exactly Is “System Data”? It is important to understand that: System Data is not a real folder, but rather a collection of data that macOS cannot accurately categorize. System Data may include, but is not limited to: macOS system temporary files Application and system caches Portions of the user Library (~/Library) Files Spotlight cannot classify Large resource files inside application packages Local caches from cloud services (such as iCloud or OneDrive) iPhone / iPad backup files Residual data from deleted user accounts Time Machine local snapshots As a result, System Data cannot be reliably inspected or reduced through simple cache deletion or Finder-based browsing. IV. Key Cause #1: Time Machine Local Snapshots Consuming Disk Space How Local Snapshots Work Even when no external drive or NAS is connected, macOS will: https://cdn.okaapps.com/resource/图3.webp Create a Time Machine local snapshot every hour Retain snapshots from the last 24 hours by default If the backup destination remains disconnected, keep local snapshots associated with the most recent full backup These snapshots: Are based on the APFS file system Do not appear as regular files Are entirely counted under System Data In some cases, local snapshots can consume tens or even hundreds of gigabytes. https://cdn.okaapps.com/resource/图4.webp Why They Sometimes Cannot Be Deleted When Time Machine uses a NAS or network storage device as its backup destination, the following situations may occur: The NAS was previously disconnected The network path or IP address changed The backup was not re-“claimed” by the system As a result, macOS may treat these snapshots as belonging to an unreachable backup destination, leading to: tmutil deletion failures Errors such as Stale NFS file handle Snapshots that cannot be reclaimed, causing persistent disk usage V. Key Cause #2: How Keynote and Similar Apps Amplify System Data Keynote itself is not malfunctioning, but its design inherently amplifies System Data usage: Keynote files are actually packages containing large numbers of resources These may include: High-resolution images Embedded videos Fonts Animation and transition assets Spotlight sometimes fails to correctly classify these resources, causing them to be grouped under System Data. For users who frequently create large, media-heavy presentations, steady growth in System Data over time is expected. VI. Effective Solutions (Prioritized) Solution 1: Verify and Restore Time Machine Backup Status (Recommended) Open Disk Utility From the menu bar, select Show APFS Snapshots Select the system Data volume Check whether a large number of Time Machine local snapshots exist If using a NAS as the backup destination: Reconnect the NAS Select the original backup in Time Machine settings Follow the prompts to claim the existing backup Once the backup relationship is properly restored, macOS can automatically manage and reclaim snapshot space. Solution 2: Use Disk Analysis Tools to Identify Real Space Usage It is recommended to use tools that analyze disk usage without automatically deleting files, such as: GrandPerspective EtreCheck The goal is to identify: Which files or directories consume the most space Whether disk usage is abnormally concentrated in specific areas Avoid relying on “one-click cleanup” tools. Solution 3: Check for Residual Data from Old User Accounts If the device previously: Had multiple user accounts Removed accounts without deleting their home folders Then old home directories may still exist and be counted as System Data. Solution 4: Rebuild the System Environment Completely (Last Resort) When System Data usage becomes severely unmanageable and no clear source can be identified, the only definitive solution is: Fully back up all current data Erase the disk and reinstall macOS During setup: Migrate only the user account Do not migrate system settings, applications, or Library data This approach completely removes legacy data structure issues. VII. Long-Term Prevention Tips (for Keynote and Content Creators) Archive older Keynote projects to an external drive or NAS Avoid storing large volumes of presentation files locally for long periods Keep the Time Machine backup destination consistently available Avoid third-party tools that perform automated “system-level cleaning” Periodically monitor disk usage with analysis tools VIII. Conclusion Abnormally large macOS System Data usage is rarely caused by a single cache or log issue. Instead, it is typically the result of Time Machine local snapshots, application package resources, and inherited historical data structures working together. Only by understanding what System Data actually contains—and addressing the root causes—can disk space issues be resolved effectively and long-term.