How to read and write files in NTFS disks and manage NTFS disks on Mac
NTFS is a file format for the disks such as U disk under Windows. Mac does not support mounting and writing NTFS disks by default. You can manage files in NTFS disks on Mac by the following steps.
Install Omi NTFS Disk Pro for free
1. Download the free Mac NTFS management tool Omi NTFS Disk Pro.
2. Double-click the downloaded pkg file and install it according to the instructions of the installation package.
3. If you are using a Mac with Apple Silicon M1, please follow the article "How to allow the system to load omi NTFS kernel on Apple Silicon M1".
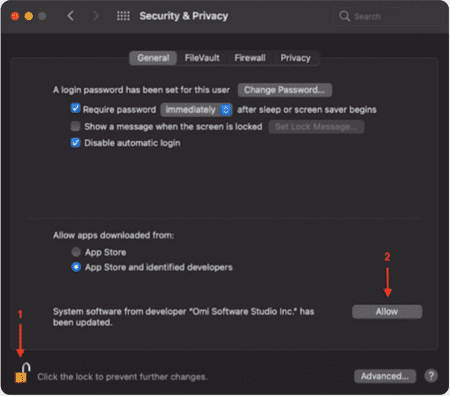
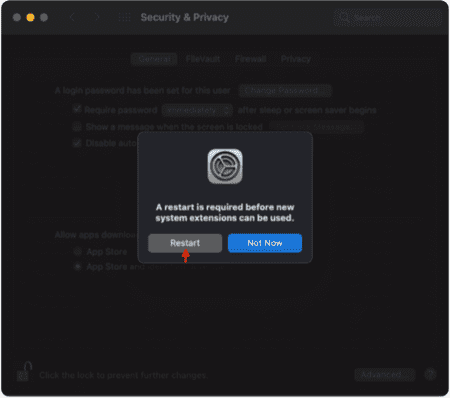
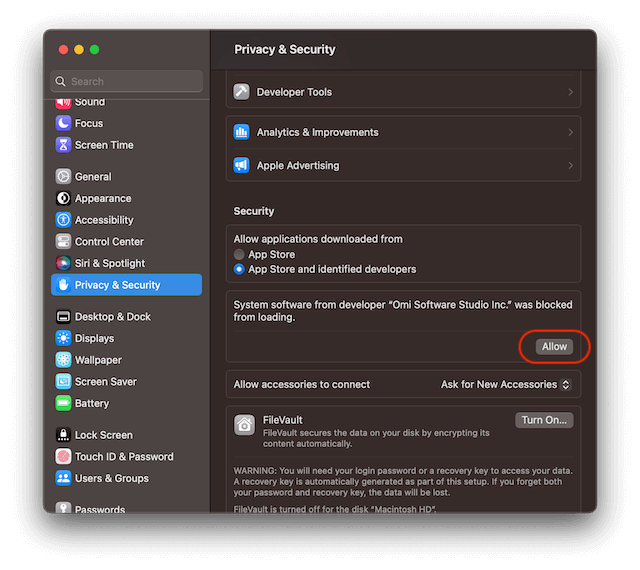
4. After the installation is complete, a message to obtain system permissions will pop up. Please follow the steps indicated in the picture below.
If the system version is below the macOS Ventura 13.0, open System Preference-Security&Privacy, Click the lock icon, allow button, then reboot the system. If no allow button shows, reboot the system directly. Skip the following steps and open the APP to mount the disk.
If the system version is macOS Ventura 13.0 and above, Open System settings, select Privacy & Security on the left, and scroll to find the allow button in the security options shown in the figure below. If you can't find it, restart the computer and see if there are any security options, as shown in the figure below. If it still doesn't, just skip the following steps and open the APP to mount the disk.
Use Omi NTFS Disk Pro to read and write files on Mac.
1. After the installation is complete and the system restarts, open the Omi NTFS Disk Pro App in the system applications and click the App icon in the status bar to view the main UI.
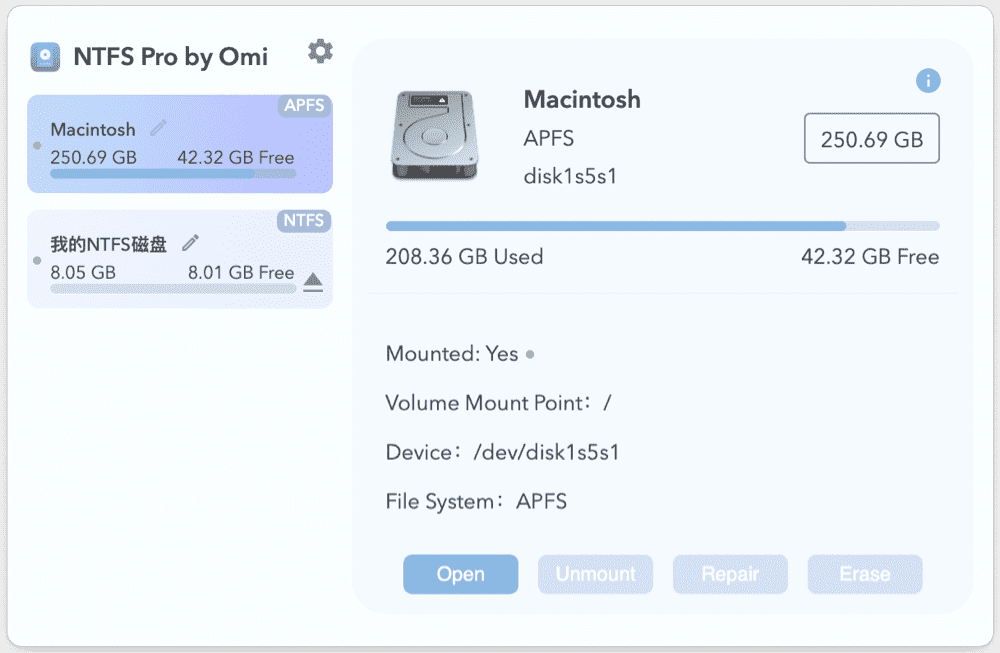
2. After plugging in the NTFS disk, it will appear in the list on the left panel. Click on the disk to view the detailed information.
3. In the right panel, you can open the NTFS disk and read and write files, mount/unmount the disk (click before unplugging the NTFS disk), repair the NTFS disk, and format the NTFS disk.
After installing Omi NTFS Disk Pro correctly, I still cannot find my NTFS disk. I can’t copy and paste the files even if I see i. What should I do?
Please follow the tutorial in the last step when installing Omi NTFS Disk Pro pkg, give system access permission, and reboot the system. Make sure the app is running when the disk is plugged in. Try to click the "Repair" button in the app. If it still does not work, please plug the disk into the windows system, repair it and do an injection before you unplug it. Then plug into your Mac and retry.
What should I do if the NTFS disk mounted fails on Mac or the NTFS disk has an error on Windows?
When the error occurs for the NTFS disk on Mac or Windows, go to How to repair NTFS disk on Mac / Windows.
How to uninstall Omi NTFS Disk Pro
If you want to uninstall Omi NTFS Disk Pro, go to How to uninstall Omi NTFS Disk Pro.